Many many many years ago, we purchased some homemade spicy Quandong relish on our way to the Flinders Ranges. It was just one of those random small country town purchases, but it lives large in our lives. We ate it all on that one trip – in particular on sandwiches toasted in the camp fire. We’ve spoken about it ever since and tried to recreate the experience over and over again, but so far it hasn’t been quite the same. I’ve been pretty intrigued by Quandongs ever since.
Quandongs are a lovely large bush/small tree that produces vivid, red fruit. They make me think of an Australian Pomegranate – distinctive, decorative, and a bit spiteful when it comes to eating them. The fruit is a bit of a tease – it comes with a large seed pit and only a thin layer of fleshy fruit, but it’s one of Australia’s most well known bush foods. The fruit is best described as tart, but distinctive; it often winds up paired with something sweet to balance it out. Quandongs grow in South Australia, and from historic records we also know that they used to grow around Mount Mary specifically.
Albert Lloyd Jefferies mentions in his, “My earliest recollections of our life at Mount Mary, 1927-35”
The name of Dad’s properly was McKeller and was mainly a pastoral property containing approximately 7000 acres. The western boundary was only half a mile from the township of Mount Mary, but it was 2 1/2 miles across paddocks to the homestead and three miles around the road.
Most towns in South Australia, and in articular the early towns, had a fairly large area around the towns themselves and this was called the common. Towns-people used to let their house cows wander around on these commons. It was necessary for whoever let their cattle run on the commanage to pay a license fee and the cows had a numbered disc on a chain around their necks.
A small area of McKeller had been cleared of trees to enable a small amount of crop to be grown. It was low rainfall country, approximately nine inches (225 mm) per year. The main vegetation was mallee, saltbush, bluebush, sandalwood, bullock bush, never fail and bindii. The country was mainly travertine or surface limestone type with a shallow covering of soil over most of it. Quandong or wild peach trees grew in them and we used to pick and eat these when the red fruit was ripe.
Page 68
Zerner, M, 1984. I Remember Mount Mary.
As we set about revegetating our block of land at Mount Mary, Quandongs were a natural choice.
Unfortunately, Quandongs are a total pain in the butt to grow.
In late 2017, a few months after we purchased the block at Mount Mary, I attempted to grow a forest of Quandongs. I gathered as much seed as I could, both ordering from suppliers and gathering locally, and set about trying to germinate them.
I knew that the seed needed to be cracked to hasten the germination process, so I carefully cracked them using a bench vice – this method cost me most of the seeds I had gathered. I found that the vice would get to a certain point and then, as the seed cracked, all of the pent-up pressure would leap forward and crush the poor little kernel inside.
Once you crack the seed, the remains of the shell are very hard and sharp. If you use a bench vice, they will kind of explode, sending bits everywhere. Wear safety goggles, and make sure you sweep up afterwards. They are not fun to step on.
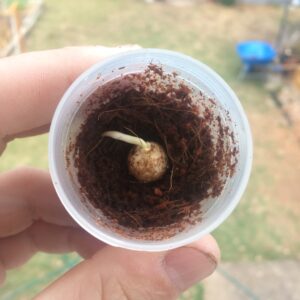
Once I had the seeds out from the shells, I put them in a bed of rehydrated coir – that funny brick of coconut fibre you get from hardware stores. Not too wet but not too dry, I placed each seed in a little sample jar[1]laboratory sample jars are very handy for this – recommended and waited.
Eventually, I lost all but two seeds to mould.
Of those two seeds that did germinate, only one actually poked its head out of the ground and formed into a proper plant. Of my 50-odd Quandong seeds at the start, through mould, clumsy seed cracking, and general poor luck, I wound up with one plant rather than a forest.

July 2019 
April 2020 
June 2021
That said, This one little Quandong has done quite well! Following germination, I kept it in a large pot for about a year before I planted it out at Mount Mary. It has grown steadily ever since, and makes me smile whenever I see it.
I’ve had a few more cracks[2]pun! at growing Quandongs since 2017, but I’ve always come up against the same issues. I destroy the seeds when I crack the nuts, and I just wind up with mouldy seeds and the whole lot gets ruined.
Flash forward to September of 2021, and my Aunt finds a large icecream container of Quandong seeds in the shed she is clearing out. It’s time to try again, and this time with science.
Specific questions
I had the following questions that needed answering:
- The seeds from my aunt’s shed were at least 5 years old. Could they still be viable? how long are Quandong seeds viable for?
- It seemed like I needed a better way to crack the shells. I was losing too many of the seeds to the explosive power of the bench vice.
- Mould had plagued all of my other attempts. Is there any way to prevent mould that wont harm my seeds?
Quandong Research
First, academic sources. Turns out I have a lot of books on native plants, written by people more clever than me.
What seed is that? recommends a soak in a mild bleach solution, followed by fungicide added to the bedding medium.
Propagation Hints: Useful plant to place back in revegetation programmes in semi arid lands. A semi-parasitic plant requiring a host plant during its early life. Before sowing it is advisable to soak seed in a mild bleach solution for 30 minutes, then wash seed nut well with water. Place seed nuts in plastic bag with vermiculite, moisten contents (not too wet). Add a little fungicide, secure bag so it is airtight. Place in an area where temperatures can be maintained between 16º-23º C, preferably 18º C. Germination will commence after a month. It is important to remove when root shoot is 1cm in length, plant out into 1 litre plus size containers. From this point the cotyledon leaves will emerge. Some propagators transplant straight from the root emergence in plastic bag into the field. Santalums do not like interference in their root system during early development. When growing on into container potting mixes should contain well rooted (sic) leaf compost , peatmoss or vermiculite and well washed fine gravel. Slow release fertilizer can be added to containers. Santalums require a host plant within the first 12 months. Sow seed nuts late Summer, or anytime to create the required temperatures. The hard nut surrounding the kernel can be gently cracked before sowing to allow moisture to penetrate. This will allow germination to occur in a shorter time.
Page 271 – Santalum Acuminatum
Bonney, N. and Miles, A., 2003. What seed is that?. (ISBN 0646198203)
Grow your own bush foods also mentioned bleach, as well as putting them in plastic bags with sawdust, ashes and peat. Not sure if the ashes would help impede the mould, perhaps?
Growing
Quandongs grow best in sandy red desert soil and will tolerate saline soil and salty bore water. They are drought-tolerant once established and do not require cold to be able to germinate. But germination is difficult.
If you crack one year old stones open in a vice and clean the kernels in diluted household bleach and plant them immediately they should come up quickly. Otherwise, put the seeds in a plastic bag filled with moist sawdust, ashes and peat and keep in a warm place. When the white spout emerges, plant in pots or directly where bushes are to grow. Uncracked seeds can take one year to germinate.
Plant out Quandongs in spring or autumns when 15-30cm tall. They must be close to a host plant, which should be a perennial, for example, native grasses, spinifex, kikuyu, lucerne and other shrubs or trees, especially citrus. Running postman (kennedia prostrata) has also been used as a host.
Page 59-61 – Quandong
Smith, K and I, 1999. Grow your own Bushfoods.
Wild Lime also suggests just not cracking the seed, and also mentions that plants grown from seed don’t seem to yield as good fruit. I’m not too concerned by the fruit quality, but rather trying to build up large quantities of plants for revegetation. Other literature suggests that good quality fruit for commercial crops is best reached through grafting, which makes sense, but is outside the scope of this work.
Wild Lime also provides a specific ratio of household bleach, which is handy!
TO GROW
Distribution: widespread in semi-arid to arid environments over most of southern Australia from WA, SA, Victoria, NSW and enters Queenslander and NT.
Quandongs are a parasitic species, and obtain nutrients through the roots of nearby plants, particularly when they are young. This makes it a challenging but interesting plant to cultivate. The Quandong grows in many soils – sand, clay, even rocky situations and in poor soils, but generally prefers the sandy soils. Good drainage is essential for success. It tolerates full sun and droughts, although watering is advisable in very dry years. The tree is highly tolerant of salinity and is frost resistant but, on the whole, doesn’t do as well in the cooler climates. The plant is widespread in the wild, but many young trees are destroyed by cattle or rabbits.
The Quandong is suitable as a plantation or garden plant along the drier areas of the Murray River in souther-eastern Australia, and, other dried parts of all the mainland states. The species is well suited as a specimen plant in drier gardens.
Germination from seed is not for the inexperienced propagator. Do not extract the seed from the stone, but store the whole fruit in slightly damp potting mix in a dark place. If you are using the seed, place in a plastic bag with the mix and keep the medium damp (but not too wet) and warm (18º C) for several weeks. Germination can begin after one or two months, although it may take much longer, even up to two years, so be patient. Germination is most successful in autumn. Plants grown from seed don’t seem to yield good quality fruit, and, the harvest may be poor.
The new plants should be repotted into ordinary potting mix. They should have a host plant, perhaps clover or lucern, growing in the same pot. Plant them into their permanent positions as soon as possible, near a suitable host shrub or tree (perhaps an exotic fruit tree, gum, or wattle) grafting is currently used to obtain quality plants. It has also been suggested that sterilising the seed may assist germination. Soak the seed for 30 minutes in a bleach like White King, diluted to ten parts water to one of bleach, before placing in the potting mix.
Page 20 – Quandong
Robins, J, 1996. Wild Lime: Cooking from the bushfood garden.
And finally, Growing Australian Native Plants from Seed provides some quite detailed notes, as you might expect. It seems to suggest that older seed isn’t necessarily a deal-breaker, and may even help in germination up to a point. It also recommends a fungicide in the germination bedding to help reduce the impact of mould growth.
Santalum (Santalaceae)
Difficult to grow from seed. The seed is contained in a hard woody shell that restricts germination. The seed also has a after-ripening period that varies with seed collected from different areas, and possibly in different years.
The use of 1-2 year old seed usually provides acceptable results, but the use of up to four year old seed will give best results.
Removing the outer shell also significantly improves results and reduces time for germination. To remove the shell is should be cracked in a metal vice. The brown parchment-like layer that usually covers seed is also removed.
Good results have been achieved by pre-germinating the seeds in a sealed bag (15cm by 18cm) filled with two handfuls of moistened vermiculite. The bags are ideal for fungal growth so ensure that strict hygiene is maintained. Use a Fungicide such as Prevacur ® and remove any rotting seeds.
The vermiculite should be kept moist but not wet. Inspect the bags each week and carefully remove germinated seed when the root is around 1cm long. Seed are then placed in a large container or directly planted in the field (see below) germination usually occurs over 1-3 months. For S. acuminatum seed has best results at 16-20ºC, with poor germination at higher temperatures. For S. spicatum best results are achieved at 20 – 25ºC.
Although not practical for most growers, results with both fresh and stored seed can be dramatically improved by vacuum infiltration of seed with a GA Solution (see page 21).
Cracking the shell then vacuum infiltration with GA3 resulted in 90% germination after 43 days. GA3 mainly seemed to work with cracked seeds.
Although not widely available, vacuum infiltration with GA4 is highly effective even with uncracked seed, providing over 90 % germination. Substantial increases in germination were obtained even with five year old seed when treated with GA4.
The plants are semi-parasitic, requiring a host species for successful growth. The range of species that can act as a host appears to be quite wide, including Eucalyptus, Acacia, Allocasaurina and even native grasses. Plants grown in contained do not require a host as long as they are planted within 12 months.
The addition of iron chelate, composted leaf litter and fine gravel in potting media may improve results. Late autumn to winter appears to be the best time for transplanting.
Page 133 – 134 – Santalum (Santalaceae)
Ralph, M, 2009. Growing Australian Native Plants from Seed (second edition)
So! That was all good research – we learned about disinfecting the seeds with bleach, treating the germination medium with fungicide, and that older seed can still be viable (up to a point). Notably, all of these sources suggested cracking seeds in a metal vice – the exact method that led to so many explosions and lost seeds.
Some research online found a few other suggestions for dealing with the shell.
- Soak the seeds in water and then lay them on hot concrete on a piece of black plastic on a 40 degree day. The heat will crack the seeds.
- Use a macadamia nut cracker (this seems like a very sensible option! they are about the same size and hardness)
- Dont bother cracking the seeds at all, and just be patient.
Additionally, this article from Gardening Australia (Quandong Garden – Episode 3, Season 19, 2008) suggests placing the seeds in rich leaf litter and just waiting. The suggestion that the worms help deal with the mould is pretty cute! It makes me wonder if we couldn’t get quite good Quandong germination by placing them in a compost heap or worm farm?
While I was pondering all of this, one of our friends mentions one of their friends has made a hobby of propagating Quandongs. They mention that vice grips are the best way to crack the seeds, because once the pent-up pressure is released they are limited in how far they can snap forward, saving the little kernel inside – very clever!
I wind up buying a pair of Irwin Straight-Jaw Locking Pliers from Bunnings. It worked.
The method goes like this:
- Adjust the vice grips so they are the right span to hold the seed comfortably.
- Release the pressure and tighten the grips a quarter turn.
- Apply pressure.
- Repeat steps 2 & 3 until the nut cracks.
This does seem to work better with the larger Quandong seeds rather than the smaller seeds – the smaller seeds are far more prone to getting crushed even with this method.
But, I still needed a fungicide. The one suggested by Growing Australian Native Plants from Seed, Previcur, is a product of Bayer and quite industrial. I couldnt find it for sale in small quantities.
After yet another trip to Bunnings, I came across Yates Mancozeb, which looked like it might do the job. They have completely different active ingredients – Previcur uses Propamocarb while the Yates product uses Mancozeb and sulfur, but I thought it was worth a shot given it was accessible and that Mancozeb appeared to be a very common fungicide. I also picked up some Coles brand Lemon Bleach on the same trip.
Putting it into practice

I got my big icecream container of Quandong seeds. I also dug up another batch of seeds I had been given by my friend Lauren (Hi Lauren!). Lauren’s seeds were younger and smaller, my Aunt’s seeds were older and larger. I got my Vice-Grips and some jars to separate the cracked shells and seeds into.

Grips set to just hold the seed 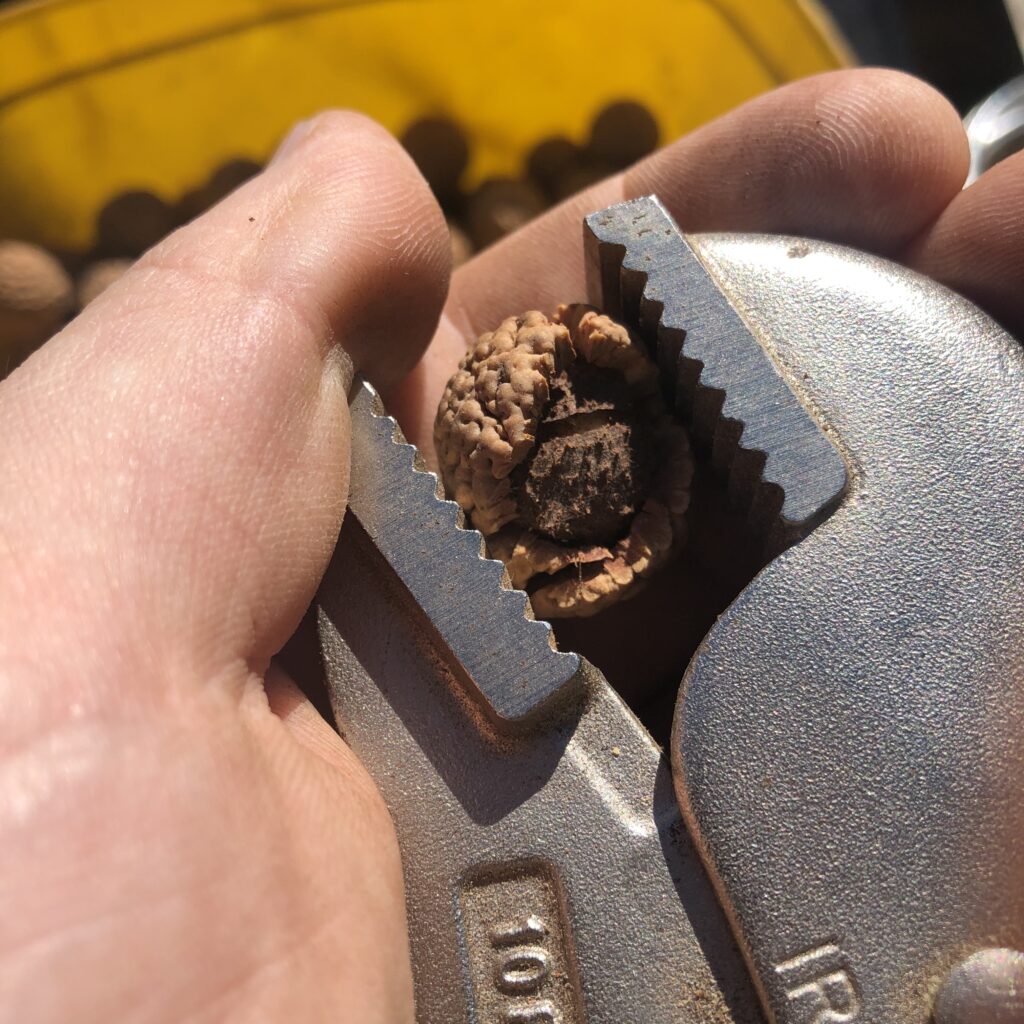
tighter and tighter until… 
Seed separated from shell
I cracked the seeds one by one with the vice-grips and popped them into a jar. I kept the younger seeds and the older seeds separate, and when I had what felt like enough seeds I soaked them in a 1:9 solution of household bleach (25ml of Coles bleach, 225ml of water) for half an hour. Following this soak, I washed them repeatedly and then let them sit in fresh water for a further couple of hours. This wasn’t really on purpose, but I didnt think it would hurt – I just got distracted.
Once I had my cracked and disinfected seeds, I rehydrated some coir. I placed a little bit of coir in a few different containers:
- Little sample jars (50ml)
- Plastic bag
- 8oz Kerr Wide Mouth Jar with a single piece storage lid
Some containers I dusted with Mancozeb, others I did not. I wanted to see if just dousing the seeds in bleach would get rid of the mould problem, or if the bedding itself also had to be sanitised. I arrived at the method of a light dusting of Mancozeb after I read the directions – it seems that it doesn’t really dissolve completely in water, and that when it is mixed you need to keep agitating it in order to get it to work as a spray. This could have been a mistake on my part, but we’ll see.
I placed two seeds each in the sample jars, and around half a dozen in the Kerr jar. I put lots more in the little plastic bag. The logic of separate containers of different sized was to get a sense of what was practical – do you need to isolate seeds in small numbers to prevent mould, or can you work with big groups? Lots of small containers are kind of annoying to keep track of, but if they get the job done I can understand.
Anyway, that was all on the evening of October 2, 2021. Now we wait to see results 🙂
Other Resources